Showing posts with label DIY. Show all posts

Sunday, May 22, 2011

bookmarks

I've been seeing these vintage inspired ribbon bookmarks everywhere and had planned to make some for Mother's Day as a tester, but I ran out of time. 

Here's my inspiration:


I busted some out yesterday and this is how they turned out:

Bear with my POS camera, but these are my first three "testers"

The end charms are too long, so I think the next round will have shorter embellishments.  I need to start stocking up on vintage jewelry for the baubles at the ends.

Cute, but I'm thinking not as functional too have such long charms...

But it does make for a cute display like this just sitting on a shelf, in a bookcase or on a table!


This is the other end of the bookmarks which I think has a more appropriate size.  Maybe this end will just receive a silver ball.

Velvet ribbon has been proven kind of difficult to find.  I think I may try some with a burlap type ribbon next.  I want to make a few to lay around the house....

Happy Sunday
-jd


Monday, January 3, 2011

Extreme MakeOVER

SO for the first time ever, against my better judgement...I purchased something from ROSS.  I try to steer clear of any stores like this because I don't like the chaos.  I like for stores to look pretty and everything to be in it's place.  This so DOES NOT fall into either of those categories.  But apparently those things it lacks allow items to be CHEAP!  And seeing as how I am in PLAN B mode, CHEAP means more mullah for said plan!! YIPEEE!! 

SO at the above mentioned locale I was able to purchase a few things.  One is my new love, one is for organization and the final is for the dream daughter herself. 

I purchased this


because every dream daughter needs one of these for accessories (as if this is going to hold a fraction of her collection)


However, BLACK is not in her color vocab.  Hence the makeover...


Okay it wasn't extreme but we like to be dramatic.

But seriously some paint and a tutu later, it's the best thing to hit Davis Place in a hot minute! 
Next to my new love which deserves its own post (of course it doesn't need a make over), it is perfect just the way it is!
-fd

Thursday, December 23, 2010

photography throuh the years

Drew and I just got back from New York City for the first time and going through the pictures, I'm thinking there are some frame worthy architecture pictures for my "wall o' pics" coming soon.  It got me thinking what else I have in my photography archives that I can use on that wall.  Here are a few of my favorites.

I took this while in Nashville.  I have a thing for crosses...I'm drawn towards the shape..the symmetry...the mystery of them.


This is a birdhouse at Drew's grandmother's ranch in Jacksonville


This was the cutest telephone booth in The Bahamas


This is also from The Bahamas.  I was into layering different textures on top of my pictures there for a while, so these next few are edited to look old and aged...


This was obviously in Clearwater.  This bird was nuts.  I got so close and it didn't move a muscle.


I think this was either in Plant City, FL or Bartow, FL...I can't remember.


This is one of my all time favorites taken in Nashville the second time I was there.


This is Nashville that same visit.


This is my husband on a 4 hour long bike ride that we took in The Keys.


This was in Key West at sunset.


This is another one of my favorites taken when I was looking around at wedding spots.  This is where we ended up tying the knot {Hollis Gardens in Lakeland, FL}.

NYC pics soon to follow

-jd

Wednesday, December 8, 2010

the OFFICE


MY office is finally complete!  However it is dark here by the time I roll back home so I can't get any good pictures, so I thought I would share a few "in process"!


The Dream Hubby painting the desk.


The office is very neutral so we decided to add color with the desk.


We went with an orange that was left over from an old Bronco that Dream Hubby painted.


Couldn't be happier with the way it turned out!

Of course that is my bulletin board finally on the wall.  In the background you can see my fav new bookshelf!  I found it in an antique shop in Senoia...if you haven't shopped this little town you are totally missing out! 
That's all I have for now!  We have changed from cable back to dsl and I have lost and found my "thing" that allows me to upload pics to my computer!  SO hopefully there will be more to come!!
-fd

Monday, December 6, 2010

Holiday Decor

The dinner party was a success!  I finished cleaning and decorating literally 2 seconds before people arrived...which left me answering the door in my PJ's, but I was changed and out mingling in no time.  

My friend Rebecca Dodson met us here and took some family pictures in the field behind our house and I can't wait to see them!  It was windy and cold, but hopefully we got a few cute ones for my wall o' photos that will be coming soon. 

In addition to my front door wreath, I also decorated my tables for the holidays.  This is what I came up with: {as always, please forgive my crappy camera}

Breakfast room table: I got that round candle or cake holder? from Kohl's on sale like two years ago...this is the first time I've used it.  I didn't have any big candles, but I still had a ton of the little ones from the wedding.  An ornament, sticks of cinnamon, and fresh Christmas tree branches and no one will know the difference.  I added twine and a moss ball that I had lying around, some sparkly starfish from Homegoods and these little paper doilies I got from Publix. 


From a distance...


Bar:  I added this last minute cause it seemed a little bare.  I had a cardboard box that some ornaments came in.  I put those fresh branches in there and threw some ornaments in.  I got all of my branches for FREE, by the way.  It's a frugal and fragrant touch.  I've found that if you just ask the tree farms if they have any branches lying around, they'll happily load them up for you. 

Dining Room: Table scape made mostly with more free branches.  I added a few festive touches to the buffet including a "necklace" for my lamp, a star tree topper and those sparkly leaf things I got on sale at Joanne's. 


I feel like this all looks so much better in person.  HAHA, but at least you get the drift.


These little birdies were my favorite thing.


Buffet


This pic was taken in the dark with my ghetto camera's flash, so it doesn't do it justice....

Here she is in action.  I threw some Christmas lights on the pergola {it's not quite done being painted} and we had the fire pit going.  It is getting chilly here in the big F. L.

It's beginning to look a lot like Christmas!

-jd


Sunday, November 28, 2010

Christmas Decor Sneak Peak!

I've been trying my best to decorate a little this season even with my limited budget.  I decided I would only buy things I love....which true to history, has been pretty pricey.  I am holding off on a tree this year because I want to DO IT UP on my first Christmas tree. 

I just finished the wreath for my front door and was dying to share.  I still might add a few twinkle lights, but it will pretty much look the same in the day regardless.

TaDa!  Whatya think?


Here's a close up.  I started with a grapevine wreath- pulled it apart a little so it looked a little messier than it originally came.  Took two different types of moss and shoved it in the nooks and crannies.  Used feathers and these sparkle leaf thingies that were on sale at Joannes and shoved them in between the grapevine.  Last, I took ornaments I got from Wal-Mart and tied them in a few spots to add some glimmer.  I had these tiny feathers left over from wedding decor that I shoved in the remaining nooks after it was all done.  I bought a set of battery operated twinkle lights that I might add tonight depending on my energy level {hee hee}.

 Here's a close up of the other side.  I know I could have went out and got a wreath for alot less than what I spent {about $60}, but I love DIY and I think this has so much more personality than the store bought wreaths.  It's a good scale and I can deconstruct it and keep adding/changing it throughout the year.  Once I pluck out those ornaments and sparkly leaves, I'll have a pretty cute fall wreath. 


Do you guys have any DIY Christmas decor ideas you can share?  I am working on a few table settings {pics soon to follow}. 

Happy Holidays and Happy Decorating!

-jd


Tuesday, November 2, 2010

sneak peak...the OFFICE

 One of the first rooms you see when you enter our house is the office.  It is a really cute space and has loads of potential. 

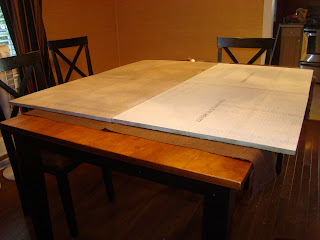
I am super anxious to get it finished.  First up on my list of to do's - a giant bulletin board!  Some place to stick 'stuff'!  I started out with 4 - 2'x2' ceiling tiles
I sprayed them with a color left over from a previous project so the white wouldn't shine through!  I decided to cover them in a brown burlap fabric.  I simply stapled it around the edges.
Next up I started with the ribbon!  Ribbon, Ribbon, lots of RIBBON! 
 [side note - I went with the ribbon approach instead of using push pins due to the fact that I know I would NEVER be able to find a push pin]
I measured 6" on each side and connected the dots!  I used hot glue for all the ribbon.
Once I got one direction entirely done, it basically created the dots for the 'other' direction.   
[I only glued the ribbon at the edges] 
Once all the ribbon was on, I used a wider ribbon around the edges to cover all the uglies.
I decided on these super cute metal letter brads to create the separation at each ribbon intersection.  This is what will keep my junk in it's place. 
My nifty box cutter came in handy to create tiny holes in the ribbon to allow the brads to go through to the ceiling tiles.  [If any of the brads felt loose,  I reinforced it with hot glue]
I really love these little letters.  I even hid each of our names in there for Phoebe to find later!
I LOVE the way it turned out!  Look for the finished product on the wall in my big office reveal!!
-fd

Supply List:
  • 4 rolls 5/8"x18' oatmeal ribbon
  • 1 and a little of a second roll of 1.5"x4yds polka dot ribbon
  • 100-125 small letter brads
  • 1-1/2 yards brown burlap
  • 4 ceiling tiles
I'm linking up to